
FAQ
-
Spoke Calculator
-
Diagram of a unicycle:

-
How do I learn to ride a unicycle?
A. Here's the information we give to new students.
Introduction: Welcome to the fun-filled world of unicycling! To kids young and old, you're about to embark on an adventure that will last a lifetime. The average time needed to learn unicycling is 10-15 hours. That's about an hour a day for two weeks.
Safety Gear: The Unicycle.com team strongly recommends a helmet and wrist guards. We've been unicycling for many years; we all wear safety gear.
Where To Learn: The best place we've found for training is a back deck, preferably made of wood, with a handrail. Wood is more friendly than concrete, and you'll need to hold onto the handrail while your leg muscles learn to react. If you don't have a back deck, try a baseball field with a chain-link fence. Pick a grassy area with solid, flat dirt and you can hold onto the fence.
Does This Thing Have A Front And Back? Yes. The seat post clamp skewer (bolt/nut or quick-release handle) is on the back. The pedal marked "L" should be on your left, "R" on your right.
How High Should The Seat Be? When you're seated on the unicycle, with one foot on a pedal in its lowest position, your leg should be almost straight.
Getting Started:


1. Pull the seat into place as shown in the top picture.
2. Spin in the wheel so that the pedal is in the 4:00 position, as shown in the next picture.
3. Put both hands on the handrail or fence, as shown in the third picture.
4. Step on the pedal closest to you. This is different from a bicycle, where you step on the forward pedal. Bicyclists are used to moving forward when mounting. On a unicycle, you want the wheel to rotate 1/4-turn backwards. Step on the pedal and you should now be on the seat with the wheel underneath you.
5. Hold onto the handrail tightly and lean forward slightly while pedaling slowly.Next is the most important tip we can offer you. When the unicycle starts to fall, let it. Stay on your feet and let it fall. The seat can be replaced; your seat can't. Continue to hold onto the handrail until you've practiced steps 1-4 at least three hours.
Congratulations! You're about 10 hours away from riding without assistance! During the next several days you'll ease your grip on the handrail and then hold on with one hand. You'll travel a few feet without assistance, then a few yards, then you'll soon discover the secret to unicycling: Lean in the direction you want to travel and the wheel will try to catch up with you. Always use caution when riding a unicycle. You are responsible for your own safety!
-
What Size Unicycle Do You Recommend?
Our unicycles are available in many sizes and colors. To order the right unicycle size for you, simply measure your inseam (the distance from the floor to crotch, with shoes on), and use this information as a guide.
- If your inseam is 19" 1/2, consider ordering a 12" unicycle;
- If your inseam is 21", consider ordering a 16" unicycle;
- If your inseam is 24", consider ordering a 20" unicycle;
- If your inseam is 30", consider ordering a 24" unicycle;
- If your inseam is 33", consider ordering a 26" or larger unicycle.
A list of our unicycle sizes available:
- 12"
- 16"
- 20"
- 24"
- 26"
- 28"
- 36"
Circus Unicycles
The most popular size for performers is the 20" unicycle. The smaller tire is easy to control, yet large enough to support the torque required for tricks.
Mountain Unicycles (Muni)
To traditional unicylists, this is a curious sport. At popular events around the world, one can see large numbers of otherwise sensible adults riding one wheel up and down steep, unpaved and uneven hills. Their appetite for adventure may be considered a bit extreme, but we applaud their fortitude.
The general concensus among muni riders is, the 24" unicycle is best all-around performer. If you're into climbing, order your muni with longer cranks (150mm to 170mm).
Unicycling for Fitness
For round the town riding, we recommend the largest size you can comforably mount. We prefer the 24" or larger unicycle. If you live in an area with steep hills, consider ordering your uni with longer cranks (150mm to 170mm).
We suggest that you start your fitness riding in small increments. If you're a new rider or haven't ridden in awhile, keep your distance to about a half mile for your first week. You'll experience some saddle soreness at first, but that'll ease up. Expand your distance about a half mile to a mile each week. Make it fun!
-
What size unicycle would be easiest to learn on?
It depends on both your leg length and what kind of riding you want to do. If the unicycle is for a child under 10 they are likely to be limited by the length of their legs, select the largest unicycle you can fit them on. A 20” wheel will roll better than a 16” and hence will be easier to learn with. If the leg length is long enough to fit on a 24" then you need to assess what style of unicycling is preferred. 20" is best for doing tricks on and riding on smooth ground – these are preferred by jugglers, skate boarders, bmxers, etc... basically people who like doing tricks. 24" is less good for tricks and is better for moving, especially over rougher ground, they are preferred by mountain bikers and road cyclists and great for all around general riding.
-
Is there a weight limit on unicycles?
Yes and no. It is not actually possible to say that a unicycle will not break when used, what we can do is offer recommendations. Here are the basic rules if you are just learning and less than 170lbs then you would probably be ok with a Hoppley or Club unicycle. If you are over 170lbs we recommend the Trainer unicycle as it has a better rim and a stronger hub. If you are wanting to jump or hop on the unicycle you should consider one of the ISIS unicycles like the Nimbus II or Nimbus trials series (except for young children) as they are considerably stronger and designed for this kind of treatment.
-
Is a 5 year old too young to learn to ride a unicycle?
No. There are many instances of children younger than 5 who have learned to ride. It often takes a little longer as younger children tend to have shorter attention spans. If you check your child’s leg length and find it is too small for our standard 12" then look at our Tini Uni. The youngest unicycle rider in the world was only 18 months old.
-
My 10 year old wants to ride a unicycle which one should we pick?
If your child is 10 they are mostly likely to be big enough to ride on a 20” Hoppley or a 20” Club, these unicycles are strong and ideal for children to learning on. If you think they are interesting in doing tricks and going further with their unicycling select a Club Limited.
-
My 14 year old son wants a unicycle and has been watching unicycles jumping on YouTube?
It is more than likely that you will need to be looking in the Trials Section. These unicycles have larger tires that absorb the shock when jumping. At 14 you should probably be looking at the 19" ISIS unicycles. We recommend the Nimbus or Impact Trials unicycles as they are competitively priced and are designed for extreme riding.
-
I am interested in off-road unicycling but I have never ridden a unicycle before, what should I buy?
We would recommend that you at least start on a 24” Club unicycle although often it is best to go straight for a 24” or even a 26” Mountain Unicycle. They have a similar crank ratio to a Club unicycle and are ideal for learning on outside. They will also take the knocks and falls of someone learning to ride. We would recommend any of the Nimbus Mountain Unicycles to be specific.
-
I am over 6.5’ tall, will I have problems finding a unicycle to fit?
No, not a problem. You just need to buy a longer seatpost and look at the unicycles like the Club or Trainer models. Do not make the assumption that you will need a bigger wheel if you are bigger, select a unicycle for what you want to do with it and then buy the seatpost to fit.
-
Why are 20 x 2.5 tires also called 19” tires?
When trials biking was first starting they stipulated that the rear tire must be 20” in diameter. The bike riders wanted a tires with more cushioning for their rear wheel so Monty took a 1” smaller old scooter rim and tire (which is nominally 20" in diameter) and used that instead of the standard 20" tire. To help differentiate between the two tire sizes the non-standard small rim tires are called 19".
-
Is there a guarantee on Unicycle.com unicycles?
Yes, the unicycles have a one year guarantee against manufacturer’s defects. We also go beyond the legal requirements, we offer you a 30 day money back guarantee on all purchases. Just return it us unused, in resellable condition and we will give you an unconditional refund. Not including shipping. At Christmas we go beyond this as we know that sometimes your well thought out presents are not appreciated. If the item is found to be in used condition and cannot be sold as brand new then a 20% restocking fee will be deducted from the price of the product returned.
-
What makes unicycle.com unicycles better than others?
Unicycle.com does not buy their unicycles from a supplier in China who produces them in the thousands for many different companies. Unicycle.com not only designs and develops their own unicycles at component level but are often the technical experts that are consulted by other brands and manufacturers regarding unicycles. They are THE experts in this area and are famous for pushing the boundaries of what a unicycle can be and do. Unicycle.com strives to make unicycles perform better and to be a better value for your money while making them appropriate for the riders ability. Remember… ALL the staff at unicycle.com rides unicycles.
-
What is wrong with buying cheap ebay unicycles?
Many of these unicycles are sold by people who know nothing about the unicycles and their only interest is to make a quick buck. As unicyclists we get annoyed by phrases like “suitable for most adults” or "Super Strong Unicycles" when the unicycles are blatantly nothing of the sort. Often they have tiny weak seats, short weak seatposts, weak single skin aluminum rims and tiny tires… all of which are unsuitable for most child riders, never mind adults! Also some might be used hard with no maintenance and are on the verge of a breakdown. If you choose to go this route we just give you a word of caution to not be taken advantage of.
-
Do you sell training polls?
We strongly recommend AGAINST using training poles. They're more likely to injure you than help you. We recommend holding onto a stationary object, like the railing on a back deck or front porch. Or try a baseball field or tennis court and hold onto the chain link fence.
-
How do I cancel an order?
Orders are usually shipped within 24 hours, so be sure to let us know right away!
Call us at 1-800-Unicycle (1-800-864-2925), or
Email us at helpdesk@unicycle.com
-
How do I get my package number?
All receipts of payment are emailed to the email address provided on your online checkout. These receipts will include your order number, which you'll find listed under the Order ID.
-
Is all your pricing is in American Dollars?
Yes, all pricing is in American Dollars. If you have placed an order that requires payment by PO or Check, please make sure that these funds are made in American Dollars.
-
How do I find the tracking number for Fedex?
Your tracking number will be emailed to you once a Federal Express Shipping Label has been created. If you've ordered a unicycle that requires a custom-built wheel, please allow up to two weeks for your item to ship.
-
I need to return (or exchange) a product bought from Unicycle.com. What's the procedure?
Returns and Exchanges Unicycle.com offers a 100% satisfaction guarantee. If you are not satisfied with your purchase it may be returned for refund within 30 days. If an item is returned after 30 days, a 20% restocking fee will apply. Please include your order number on the below label.
If you do not have your order number, please call us and we will provide it.
Conditions:
• Item must be in brand-new condition (i.e. no tire wear or scratches on the seat or pedals)
• Item must be in original packaging. Please pack and pad the item/s well so no scratches or damage occurs during return shipment. Additional charges will apply no matter where the damage occurs.
• Shipping charges are non-refundable.
• Custom cut spokes are not returnable.
We recommend that you use a return shipping method that allows the item to be tracked such as UPS or USPS Priority Mail. Please include the following information.
E-mail Address:
Order #:
Name:
Daytime Phone Number:
Reason for return:
We will contact you for credit card information.
Please designate any additional instructions on the top of this sheet.
Thanks!
Unicycle.com Attn: RETURNS
1148 JVL Court STE 170
Marietta, GA 30066
Order #
-
Does the box have the word unicycle on it?
Yes. All boxes shipped from Unicycle.com have the word Unicycle or some kind of logo on it.
We are sorry for any inconvenience, if its for a surprise please consider shipping to your work, a family member or a neighbor.
-
What size wheel?
To check whether you are tall enough or need a longer seatpost. Here is a rough guide. You will find exact sizes in the item description, remember these sizes are from your crotch to the floor with your shoes on, not just your pant length.
You also need to decide what you want to do with your unicycle. Here is a breakdown of the sizes:
- 12" Unicycle - This is a unicycle designed for a smaller child. It's good for children who are too small to ride a 16" unicycle, but it needs smooth ground and is not really good for outdoors. For children up to 5 year olds. Cut Down Seatpost: 18.5" (47cm) Minimum Leg Length: 19.5" (50cm) Maximum Leg Length: 24" (61.5cm)
- 16" Unicycle - This is a children's unicycle, the small wheel makes it only suitable for very smooth areas. Best used indoors or on smooth ground; not so good outdoors especially if it is rough or uneven, good for learning for 5 to 8 year olds (always check your childs leg length to be sure) Cut Down Seatpost: 20"(51cm) Minimum Leg Length: 23.5" (60cm) Maximum Leg Length: 29"(74cm)
- 20" Unicycle - Traditionally the most popular size of unicycle. These are great indoor, they turn quick and the best size for tricks.. They are great for unicycle hockey or basketball. They are used for Trials with a big tyre. The down side is that they make poor distance machines. Good for learning. Cut Down Seatpost: 24" (61cm) Minimum Leg Length: 28" (71cm) Maximum Leg Length: 33" (84cm)
- 24" Unicycle - This is a common size among adults. Good for outdoors on paths, offroad and open areas although it can be a little bit big for indoors unless you have access to large hall or gym. The bigger wheel can make some of the advanced freestyle tricks harder. Good learner machine. Good for Muni and Trials with a big tire. Cut Down Seatpost: 27" (69cm) Minimum Leg Length: 31" (79cm) Maximum Leg Length: 36.6"(93cm)
- 26" Unicycle - This is a machine for Muni. If you are interested in offroad then this is what you need if you are not a beginner. These are also great street unicycles. Not really suitable for indoors. Cut Down Seatpost: 29" (74cm) Minimum Leg Length: 32" (81cm) Maximum Leg Length: 36" (92cm)
- 29" Unicycle - This is good for communting. The big wheel makes it fast and smooth. You can also use this for off-road but it's not so good for very rough terrain. Not as fast as a 36" but lighter and more nimble. For advanced riders. Cut Down Seatpost: 30" (76cm) Minimum Leg Length: 34" (86cm) Maximum Leg Length: 39" (100cm)
- 36" Unicycle - The commuting unicycle. If you are a speed fiend then consider one of these, they are fast and smooth. Not a learners unicycle at all and not for indoors. Cut Down Seatpost: 29.5" (75cm) Minimum Leg Length: 29.5" (75cm) Maximum Leg Length: 40.5" (103cm)
Note: These are approximate sizes only, check the catalogue for the model you want. The cut down seatpost measurement is there to show the leg length after you have cut the seatpost shorter. If your legs are longer than the maximum leg length for that size unicycle you can always purchase a longer seat post.
-
What style of unicycle?
There are lots of different styles of unicycles because there are lots of different things that you can do on a unicycle. When deciding which unicycle is suitable for you it is worth deciding what sort of riding you are planning to use the the unicycle for. Here is a list of the main styles.
Beginner:
We use this term to describe those unicycles that we feel most suitable for someone who is learning. These are generally the same as the freestyle unicycles but of a less specialist nature. To help people when they are buying their first unicycle we offer in dropdown boxes the most commonly bought items when learning to unicycle. We have two types of learner unicycles; Hoppley and Club unicycles, which are suitable for children and are not recommended for people over 150lbs and not for jumping or rough use. The Trainer and Schwinn unicycles are stronger with CroMo hubs and are suitable for adults as well as children. If you would like a unicycle thats even more durable than the unicycles previously listed, have a look at our Freestyle Unicycles.
Freestyle:
This is a term used to describe the unicycle competition where music, movement and high skill level are mixed. This is a style of riding that is very competitive and looks like ballet on a unicycle. The most common size for freestlye is a 20" wheel. Freestyle unicycles have low tread to no tread tires to help with tricks (most non-marking due to the use of a gym at a school). At Unicycle.com we also use the term 'freestyle' to describe the basic ranges of unicycles that are suitable for performers and the majority of tricks and games, like unicycle hockey or basketball.
Trials:
Trials riding is a style which involves jumping over obstacles such as picnic benches, up stairs or along railings, with the least amout of hops and dabs. Trials unicycles have special 19" rims and massive 2.5" wide tires to help absorb the impact from landing and for greater stability. Trials unicycles are available with ISIS hub/cranks or cotterless hub/cranks. ISIS hubs being much stronger with there 22mm diameter axial. Trials unicycles also work well for mountain unicycle for kids who are quite tall enough for a 24" mountain unicycle.
Street:
Street unicycling is one of the latest developments in unicycling. The aim of the sport is to use natural/urban/specially made obstacles such as ledges, handrails and stairs in a given area to perform tricks that look good. The emphasis falls on technical proficiency, style and creativity. Street unicycling draws inspiration from skateboarding and bmx bike riding, with many similar tricks. Some street riders prefer to ride 20" trials unicycles because of their light weight, good hopping abilities, smooth maneuverability. Some street unicycles have long seattubes to get the clamp out of the way for some specialized tricks. However, some riders prefer using the less conventional 24" and 26" wheel sizes.
Flatland:
Since its birth in 2009 this style of unicycling is similar to freestyle in that various tricks and movements are performed on flat ground. Flatland, however, does not have the performance element of freestyle, but instead has tricks that are similar to those in BMX and skateboarding. Most riders use a flatland unicycle (a trials unicycle with a true 20" wheelset using a high volume tire and short cranks like 100mm to 114mm) or they use a standard trials unicycle with the same short cranks.
Road:
It would not be sensible to use a 20” unicycle to commute to work or school. There are unicycles better suited for this, these we refer to as road unicycles. They generally have larger wheels and proportionally shorter cranks. The UDC 36" and the Coker have a 36” tire are capable of speeds in excess of 20 mph with an experienced rider. While the 29” Nimbus road is quite capable of exceeding 15 mph. These large wheeled unicycles can also be used for cross-country unicycling when fitted with an off-road tire. If paired with the Schlumpf geared hub you can now also use a smaller wheel but gear it up for commuting or long distance riding. These are not unicycles we would recommend for beginners, they are a better 2nd unicycle as you become a more experienced rider.
Mountain: (Muni)
Muni as most unicyclist call offroad riding was originally used by Pashley for their range of off-road unicycles. Offroad unicycles have to be very strong and generally have bigger wheels and longer cranks. The wheel size can vary with 24" for very technical riding and jumping. The 26", 29" and 36" for covering greater distances. Unicycles with ISIS hub and cranks are much stronger than cotter-less but can be more expensive and heavier depending on design and frame material.
Giraffes:
A giraffe is a tall unicycle or to be exact a unicycle which is driven with a chain. This needs to be said because there is no way you could call a mini giraffe a tall unicycle at only 18” above the ground! Giraffes are generally easier to ride than a standard unicycles after you have over come the fear of being so high and the problem of getting up there. This being said, they are not for the beginner because falls can cause injuries.
Ultimate Wheels:
These are like a unicycle with the saddle and frame missing, just a wheel with pedals attached. Quite challenging to ride, though the bigger the wheel the easier they are to ride as you can pedal more slowly.
Impossible Wheels:
These are just a wheel with two pegs extending off the axle to balance on (like the BC, Johnny Hart Comics). Beginners use footplates that are lower than the axle because it is easier to learn on.
-
Why does crank size matter?
This is not an easy question, it depends what you want to do with your unicycle. All the unicycles are sold with the appropriate sized standard length cranks but you can upgrade your unicycle with different size cranks. As a general rule, the shorter the crank the faster you can ride, the longer the crank the more control and power your can have. Cranks are measured from the center bolt thats mounted to the hub and the center where the pedals are threaded in.
- 16" Unicycles - Can only be fitted with 100mm cranks or smaller otherwise the pedals touch the ground when riding.
- 20" Unicycles - 75mm are for advanced freestyle, 89mm are still too short for beginners but are good for advanced skills such as pirouettes. 100mm cranks give a smooth fast ride but make idling harder, 114mm cranks are a good length for freestyle tricks and hockey. 125mm cranks give a lot of torque and are good for beginners. 130mm to 140mm are for Trials, 150mm are a bit long.
- 24" unicycles - 114 mm cranks are very smooth and should only be considered if you are a speed fiend, 125mm cranks are smooth and still quite fast, although are ok for idling, 130mm to 140mm are great for firewood type riding where some leverage will give you control but spinning to go fast are important. 150mm cranks are great for off road and beginners. 165mm are used for very steep and technical Muni.
- 26" & 29" Unicycles - 114mm cranks make a great long distance machine on flat surface but very hard to idle, although some riders do go as short as 75mm. 125mm cranks are smooth and make a good street machine. 150mm cranks are great for standard Muni riding and trick riding. 165mm and 170mm are for heavy mountain riding to severe technical riding, these give you the ability to go over and up almost anything!
- 36” Unicycles - 89mm cranks, yes; you can put them on a 36" unicycle and they make an incredibly fast unicycle - experts only! Sensibly you should consider 114mm the shortest for general riding and make nice smooth action although 125mm cranks create an extremely fast machine for most use. 150mm cranks are standard for beginning with and should be considered the starting point for all but experienced riders.
-
How to cut down your seatpost?
The shortest seatpost we offer is 220mm. Any seatpost length will give you a range of 100mm in height. While this will be suitable for many people it may not be suitable for you. If you are too tall you can order a longer seatpost, if you are too short and don't want to reduce your wheel size a good option is to cut down your seatpost. By cutting down your seatpost you shift the range of heights available downwards.
There are 2 basic ways you can shorten the seatpost:
- Using a hacksaw - Measure how much you need to cut off (keeping this to a minimum) and mark. Using a guide is preferred but not a must, start by setting the blade on the spot you marked on the seatpost and start cutting. The use of a flat and rattail file will clean up the edges and keep the seatpost from cutting anything.
- Using a pipe cutter - Measure how much you need to cut off (keeping this to a minimum) and mark. Gently tighten the blade of the seat post cutter to your mark, clamping it in place before rotating the seatpost. (Holding the handle of the seat post cutter turn the seatpost towards you otherwise it can spiral and damage your seatpost.) Tighten the blade gently every 360
-
How to use your Unicycle stand?
If you already have an unicycle you may have figured out that they are quite hard to stand up. They won't lean against a wall very well, being freestanding is not an option and you will get tired having to hold them all the time you're not riding so what's the solution? A unicycle stand could help.
Available to buy separately they appear to be straight forwards but can actually prove quite tricky, here are instructions for the inexperienced stand user:
Make sure the stand is stood the correct way up the wide short bit is the base with the longer thinner bit vertical.
Choose which direction you want your unicycle to face.
Hook the rear crank through the gap in the middle of the upright section.
Rest the wheel on the base as far forwards as possible, preferably with the tyre touching the lip at the front.
Carefully lean the unicycle frame back into the curve of the upright section and let go!
-
Assembly of Split bearing housing Unicycles (40mm)
-
Assembly of Machined bearing housing Unicycles (42mm)
-
Assembly of Giraffe Unicycles
-
Installation of the D-Brake Mount

-
Upgrading Parts:
Saddles:
When you are learning, you can destroy your saddle with the constant dropping. We sell a wide range of saddles from the top companies: Hoppley, Club, Trainer, Nimbus, Impact and Kris Holm. You can also change your saddle bumpers if there the only part of your saddle damaged. If your looking for a more comfortable saddle there are many options, a thing to remember is saddles are a personal preference. So trying out a saddle for the type of riding your looking to do can be a challenge but will be well worth it when you find one that works well for you.
Seatpost:
Have you outgrown your existing unicycle? Have you broke your seatpost? Do your want to adjust the tilt of your saddle more? We have seatpost to fix all those issues. Older seatposts tend to be 22.0mm, 22.2mm or 25.4mm. The current unicycles tend to be 25.4mm or 27.2mm.
Seatpost Clamps:
It can be very annoying to be constantly straightening your seat, so one of the most common upgrade is to add a double bolt or double quick release seat clamp to your frame. These clamp more area on the frame and help keep your seat in position you want even under the worst conditions. Beginners though are the other way round they need to be able to move their seat position regularly until they find the optimum height for their riding style, and to reposition your saddle if it moves.
Frames:
We carry frames for people that want to replace, update, upgrade and or custom build their unicycle. When you are looking to buy a new frame be sure to make note of your bearing size and hub width, this is important to make sure the new frame will fit your wheelset.
Brakes:
Brakes are a great addition to most unicycles. Brakes are a must for riding on roads when running 125mm cranks or shorter for control when going downhills to save your legs and stay on the unicycle. For mountain riding they are beneficial to have for technical terrain and downhills technical or not. When using the brake, you use it for drag only. Its not like using them on bikes. There are a couple options out there when considering what to ride with. The magura hydraulic rim brake is a classic that has been used for years on unicycles which require magura direct mounts welded to the frame. Disc brakes are also a great option that can be added to most unicycles with adaptors easily bolted on. If you choose to upgrade your frame the Nimbus Muni and Kris Holm frames will fit both style of brakes, the Nimbus Oracle and Oregon frames are disc only with using the Nimbus D-Brake mount.
Rims:
Rims are a worth while upgrade. Most times you may want to wait till the rim you have now gets damaged though. If your looking to just replace it then a good question to ask is, what would you like the new rim to do? The 2 most popular is to go to a lighter or a wider rim. There are great options available that work the best for unicycles on our site.
Tires:
One of the biggest, easiest and most noticeable upgrades you can do to your unicycle is replace the standard tire. On a unicycle all your weight is on one tire unlike a bicycle. For Muni the larger volume tire is preferred for suspension and control on unicycles. For Freestyle the non-marking Primo The Wall is one of the best tires of its type in the world. For Trials we sell the 19" Creepy Crawler & the NImbus Cyko lite. For road on a 29" the Schwalbe Big Apple 2.0 is one of the best. Tires are always getting better so as we find models that are good for unicycling, look to our site if your looking for something different to try.
-
Understanding the types of unicycle cranks:
Cotterless (square) Cranks
This is the standard crank that comes on most modern unicycles sub $200. The hub axle has tapered ends with a square cross-section and a bolt or nut to hold the cranks on. The cranks are forced onto the axle to create a press fit and locked in place with the bolt or nut. You should never ride with loose cotterless cranks as this will round the corners off the axle and distort the square hole in the crank, preventing them from fitting tightly ever again. This is why this style of crank never stays tight after it has been road loose just once.
ISIS cranks
These are a type of splined crank but have tapered axles so it is still considered a press fit. To remove the crank it is similar to cotterless cranks BUT you must use a crank extractor with an ISIS head, otherwise it will damage the threads on the axle. Some extractors have a removable ISIS head so you can use them on cotterless and ISIS cranks. ISIS cranks will not fit Koxx axials, these cranks are not cross-compatible as are different spline formations.
Splined Cranks
Splined cranks are similar to the ISIS but do not use a press fit onto the axial. Most use a retainer bolt on the crank to keep it from loosening with the exception of the Onza with the Kris Holm/Onza cranks, they use a series of concave washers and shims. The bolts will probably need to be tightened after a week of riding and checked regularly after that. For more information read our section on maintenance of splined cranks. Never ride with the cranks on the wrong side or you will destroy them where the pedal is threaded in.
Profile Splined Cranks
Profile Racing developed a unicycle hub to fit their Bmx bicycle cranks. Profile uses a fine 48 spines on a 19mm spindle, this system works great for the demands it was designed for.
-
Basic unicycle maintenance:
Unicycles are not complicated but they do take a little bit of maintaining. Here are some of the key points:
Creaking Cranks:
Stop riding immediately and tighten! If these are left ignored they will destroy the cranks and or hub. The creak comes with downward pressure of the pedal and is often confused with loose spokes. For Cotterless cranks: remove the caps from the end of the cranks and tighten with a 14mm socket wrench (or 8mm allen key). For ISIS Cranks: tighten bolt with 8mm Allen Key
Creaking Spokes:
After some time spokes stretch and slacken, this is not normally detrimental for the wheel but does weaken it if not addressed. Tightening a wheel is a job that is normally considered to be a job for an expert like a local bike shop, but if approached carefully, it is not difficult for anyone to learn how to do it (there are plenty of how to videos out there). If the wheel is just loose, but centered on the frame, tighten each spoke using a spoke wrench by a quarter turn, being careful not to miss any, repeat until spokes are tight.
Loose Pedals:
Stop immidiately! This issue is not considered a warranty for any brand! Check that you have the seat facing forward (a good indicator is a relief that is cut into the frame under the seat clamp should be facing the back of the unicycle) and you have the right pedal on the right-hand side. If your pedals come loose it is almost certain that you have the right-hand pedal on the left side and vice-versa. If this is left for any length of time then the crank and pedal will be destroyed. Tighten with a bicycle type 15mm wrench. If you have damaged your pedals and cranks we do sell replacements. To remove the cranks you will need a special tool called the crank extractor.
Loose Seat Bolts:
When learning to ride, the constant dropping of the unicycle can cause the bolts that hold the seat to its post to come loose (this is considered normal). Check and tighten these regularly. To do this you will need a 4 or 5mm allen or a 10 or 11mm socket wrench to tighten.
Loose Frame Bolts:
If you feel the frame clicking or moving then stop and check the bolts, if left loose the frame can develop cracks and will be destroyed. Use a 5mm allen or 10mm socket to tighten the wheelset tight enough that it won't rattle but not tight enough to restrict wheel movement, keep in mind that its a bearing adjustment as well as holding your wheel on the frame.
Frame Bolts:
Its not very common to find these bolts coming loose. If they do then they should be tightened immediately. It is considerably more common to find them over tightened! If the wheel does not rotate freely then the bolts should be loosened by about a quarter or half turn. If the bearings are left over tightened for too long they will disinagrate and require replacing.
Under Inflated Tire:
It is bad practice to ride a unicycle with a flat or an under-inflated tire, because all your weight is on a single tire, so you need to have the pressure higher depending on your riding style. An under-inflated tire can also cause the wheel to buckle under rapid turning or bouncing causing a pinch flat.
Worn Tires:
When a unicycle has been ridden for a bit you will notice that there is one or possibly two areas of the tire that are getting considerably more wear than any other. This is due to idling and turning. This can be remedied by letting the air out of the tire and then rotating the tire 90 degrees, or you can remove your cranks and reinstall them in a different position on the axial.
-
Change bearings:
Bearings on unicycles generally last a long time. Even when you take your unicycle in a fountain, or the sea, or just splashing around in the mud. They do give up in the end though, normally at the worst moment possible (like a race) you will hear them grinding first, then when you turn the wheel slowly by hand you can feel the restriction in the movement and a slight detent.
This is to give you a guide of what to do if you are brave enough to try and replace them yourself. Be warned this is not an easy task and requires special tools, most bike shops will be able to do this for you.
What you will require:
- Replacement bearings - see our catalogue for quality replacement bearings.
- Crank extractor - again we sell these.
- Socket set - not really necessary, normal wrenches can do but makes it easier.
- Rubber hammer/mallet - again not really necessary, a little imagination can find other things that will do.
- Bearing puller - either as small 2 or 3 leg bearing puller - this is essential.
- Scrap of wood or Block - not really necessary but it helps to prevent damage and get accurate fit.
To remove and fit bearings:
1. Remove the dust covers from the cranks if you have them.
2. Remove the nuts/bolts from the center of the cranks
3. Remove the cranks using a crank extractor (see instructions). Be sure to screw the extractor all the way fully before you start to extract the cranks.
4. Remove the wheel from the frame, in most cases this involves removing 4 bolts from the bracket that surrounds the bearing. In the case of the Lollipop bearings the screws are in the side of the fork legs and the bearing holder stays with the bearing.
5. Fit a 2 leg or 3 leg bearing puller over bearings and use a wrench to pull the bearing from the hub. Be sure to seat the legs of the bearing puller securely under the bearing so that it is not destroyed before it is removed from the hub. On a lollipop bearing you need to extract the whole bearing holder. Do not try to remove with a lever or screw driver behind the bearing, it will damage the hub. For ISIS hubs use the ISIS cap from the crank extractor or something similar to prevent the bearing puller damaging the threads in the hub.
6. Once the bearing has been removed, clean the hub shaft with steel wool and little oil to remove any rust or dirt.
7. Put the new bearings over the shaft (be sure to fit spacer on first if one was fitted) and gently push, ensuring that it is square with on the axial. When it can not be pushed any further by hand place the old bearing on top of the new one and slip a pipe or socket on top. Ensure that the pipe/socket is pressing on the center of the bearing race, not the outer ring or rubber seal. Place the wheel on a piece of scrap wood to protect the other side of the hub axial. Hit the pipe/socket with a hammer until bearing is seated. Remove the old bearing.
8. Clean the bearing holders to be sure that there is no dirt or rust.
9. Re-fit the wheel in the frame. Be sure not to over tighten the bearing cups as this will impede the performance of the bearing.
10. Re-fit the cranks on the hub. Be sure to check that the cranks/pedals are on the correct side. On the end of the pedals there is a letter L or R for left and right and a letter on the back or front of the cranks.
11. Place the unicycle on your scrap of wood and use a rubber mallet to hammer the cranks on setting the pressfit (for cotterless and ISIS cranks only).
12. Tighten the nuts/bolts in the end of the hubs, these must be secure. Tighten snug, but do not over tighten.
13. Replace the plastic dust caps if you have them.
-
How to remove your cranks?
There are four types of cranks: cotterless (square taper), ISIS, splined and cottered (cotter-pinned).
Cotterless Cranks:
This is the standard crank that comes on most modern unicycles. The hub axle has tapered ends with a square cross-section and a bolt or nut to hold the cranks on. The cranks are forced onto the axle to create a press fit and locked in place with the bolt or nut. You should never ride with loose cotterless cranks as this will round the corners off the axle and distort the square hole in the crank, preventing them from fitting tightly ever again. To remove cotterless cranks you will need a crank extractor. First remove dustcover (if fitted) then unscrew (counter-clockwise) nut/bolt with 14 socket wrench or 8mm allen key. Install the outside threaded portion of the tool to the inside of the crank (making sure the threads are fully engaged) before turning the handle on the tool. Next turn the handle to extract crank. Then unscrew the outer threaded section to separate it from the crank. To fit cotterless cranks; gently seat the crank on the axle and press it into position with a mallet (not metal), then tightly lock in place with the bolt/nut. Make sure the righthand crank is on the righthand side and the lefthand crank is on the lefthand side before riding otherwise you will wreck the cranks.
ISIS Cranks:
These are a type of splined crank but have tapered axles so their removal is similar to cotterless cranks BUT you must use a crank extractor with an ISIS head otherwise it will damage the threads in the axle. Some extractors have a removable ISIS head so you can use them on cotterless and ISIS cranks.
Splined Cranks:
Splined cranks are stronger than cotterless cranks due to the bigger diameter of the axial and therefore are more suitable for muni or trials unicycling. They do require slightly more maintenance. There are several different models out there: Kris Holm, Kris Holm/Onza, Onza, Profile, Qu-ax, Koxx and Torker. Please keep in mind these cranks are not cross-compatible with each other unless specified. The bolts will probably need to be tightened after a week of riding and checked regularly after that. Never ride with the cranks on the wrong side or you will destroy them.
Cottered (Cotter-pinned) Cranks:
These do not come on any new unicycles. The crank is held in place by a tapered bolt, called a cotter-pin, which is at right-angles to both the axle and the crank. To remove the cotter-pin; unscrew the nut slightly then carefully hit with a hammer/mallet. Repeat this process until the pin is completely removed. Do not completely remove the nut and hit it with a hammer since this tends to bend the pin, making complete removal a little more difficult. When you change a cotter-pinned crank it is recommended that you also replace the cotter-pin. Before riding, make sure the righthand crank is on the righthand side and the lefthand crank is on the lefthand side before riding otherwise you will ruin the cranks.
-
Using our Crank extractor:
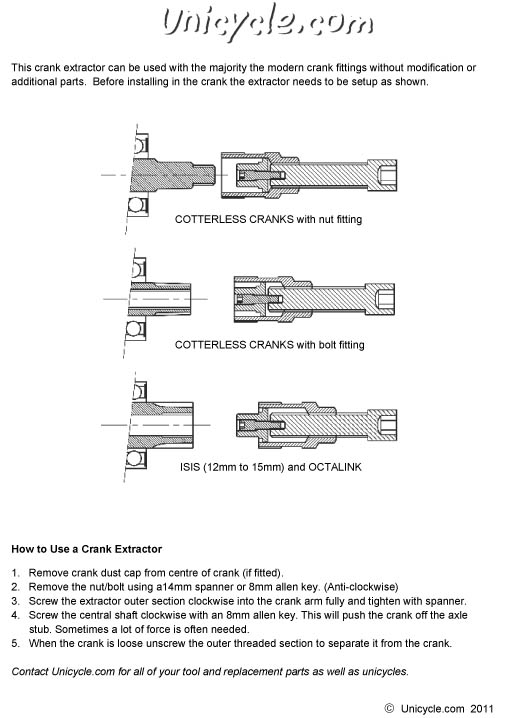
-
Tuning new cranks on twin chain giraffe unicycles
If you ever have to replace the cranks on a twin chain giraffe unicycle you will need to “tune” the chain system so that the two chains work correctly together. You will know if you need to tune the chain system if one chain is tight at the front while the other chain is and visa-a-versa. Depending on how much adjustment is needed there are 3 processes than should be followed until you find the one that tunes the system for your giraffe.
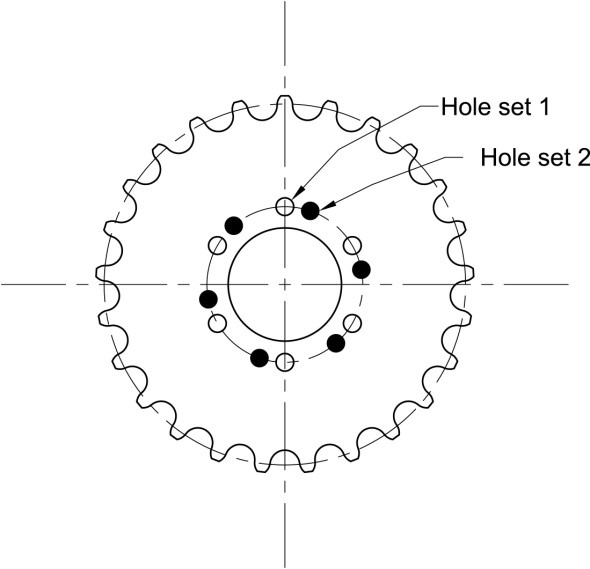
Method 1.
At the wheel you will see 2 plate sprockets. These are held on by 12 bolts (6 per side). Loosen these bolts by a single turn each while the chain is in place. If there is only a small amount of adjustment required the chains automatically centralise the sprockets in the correct place. If this is the case, tighten up the sprockets and the tuning is done. If this is not the case, go to method 2.
Method 2.
Repeat method 1, but this time take all the bolts out of the sprocket that has 12 holes on it and allow it to it rotate until you can use the second set of holes. This should allow the sprocket to rotate further than the tolerance in the holes allowed in method 1. If this does not work – or makes it worse, go on to method 3.
Method 3.
Remove the wheel from the frame and remove the 12 hole plate sprocket and flip it over. Now re-apply it (loosely to begin with). Re-mount the wheel and repeat firstly method 1 and should that not work then method 2 will work.
Good luck with your maintenance. Remember; to do regular checks on all bolts and lock-nuts on your giraffe to be sure that they are tight. Damage can occur (both to the giraffe or yourself ) if the giraffe is ridden when parts are loose.
-
What size seatpost clamp do I need?
Bikes have always specified the clamps by the frame size. Unicycles didn't start out that way and have been lucky in that they only needed 3 sizes for ages.
This list will help clear things up if your not sure:
Steel frames:
22.0mm - 22.2mm seatposts (25.4mm clamp size)
25.4mm seatposts (26.8mm clamp size)
Aluminum Kris Holm and Impact frames:
27.2mm seatposts (31.8mm - 32.0mm clamp size).
Aluminum Eclipse and Equinox frames:
25.4mm seatposts (30.5 clamp size)
Aluminum Oracle frames:
25.4mm seatposts (31.8mm - 32.0mm clamp size)
-
Quick Starter Guide:
Introduction:
Welcome to one of the most fun things you’ll ever learn! Anyone of any age, young or old, can learn how to unicycle and it’s not as difficult or as dangerous as people think. It only takes the average person 10-15 hours of practice which only turns out to be an hour a day for 2 weeks. Just like a bike, once you learn you will never forget and you’ll be able to do it for a lifetime!
Safety: Although safety gear is not mandatory, we strongly recommend wearing a helmet, gloves, wrist guards and knee pads. It is always better to be safe than sorry!
Location: The best location to learn how to unicycle is somewhere that has a flat, smooth surface preferably with a wall or handrail to hold onto. A back deck, gym, tennis court or baseball field with a chain-link fence all work great! If you don’t have anything to hold onto, you can always have a parent or friend help you out and they can be your “moving wall”. Actually this is the best method as you’ll learn below.
Seat Height: Having the seat the correct height is crucial for learning. If it is too low or high it will be very hard to learn. For most people, the seat should be about where your belly button is when you are standing with the unicycle in front of you. As everyone is different this is a rough estimate and you may need to adjust it accordingly. When seated and the pedal is in the farthest down position, your leg should almost be straight with just a slight bend in your knee.
Getting Started: **IMPORTANT**
Before you begin, make sure the left crank is on the left side and the right crank is on the right side otherwise you will damage the unicycle. On the inside of the crank arms there are marked letters L for the left and R for the right.
Figure out if you are left or right footed. Stand with both feet together and step forward. Usually whatever foot you step with first is your dominate foot. As most people are right footed we will use this as the example. If you are left footed, just replace all the rights with lefts from here on out.
Place the unicycle in front of you with the right pedal in the 4 o’clock position. This means that the right pedal should be towards the down position and slightly towards you.
Grab a wall, handrail or another person and place your right foot on the right pedal. When you step on the pedal the unicycle will naturally rotate ¼ of a turn backwards and come under you which is what you want. Note that this is different than a bicycle where you step on the forward pedal.
Place your left foot on the left pedal and you should now be sitting on the unicycle.
Position your cranks so they are horizontal or parallel to the ground. This is the “stop” position and is a good position for the unicycle. When the cranks are vertical or perpendicular to the ground (one pedal is up and one is in the down position) they are in the “dead” position. You will always want to stop when the cranks are in the “stop” position and never in the “dead” position. This is due to the fact that it is much easier to control when in the “stop” positions and very difficult to control in the “dead” position.
Now that the cranks are in the “stop” position, sit there for awhile and get comfortable. You want to be sitting on the seat instead of standing on the pedals. This means that most of your weight should be on the seat with little weight on the pedals.
After you get comfortable, lean forward and pedal ½ a revolution to the next “stop” position. You will want to learn in ½ revolution increments. Regain your balance in the “stop” position and then try and go another ½ a revolution. You will want to keep on doing this until you get good at it.
The next step is to do a full revolution every time instead of a ½ a revolution. Again, every time you stop you will want to make sure that the cranks are in the “stop” position (parallel to the ground).
Continue the practiced steps 1-8 for at least three hours. Then it is time to keep on riding without stopping. Congratulations as you much closer from learning to ride without holding on to anything!
Over the next several times you practice you’ll want to slowly start easing your grip on the wall, handrail or person you are holding onto. Eventually you will only be slightly holding on and then you can go for gold and let go and see how far you can go! At first it will only be a foot, then a couple feet and eventually you will be able to ride as far as you want!!
Very helpful tricks and tips to speed up the learning process:
The single most important tip we can offer is to NEVER GIVE UP and keep trying it over and over until you get it. Yes, you will get frustrated at times and want to give up, but keep with it and you will not regret it. Practice makes perfect!
The second most important tip we can offer is to let the unicycle fall to the ground when you fall and try to stay on your feet. Do not worry about catching it at first. Unicycles are built to be dropped unlike bicycles. They have protective bumpers on the seat that will last a very long time. They will get scratches on them but that is normal and they can be replaced if needed for a very minimal cost. Sit up with your back straight and look forward. Do not slouch or look down! DON'T look down at the ground. Look straight ahead at the horizon. As soon as you look down you lose the horizon and your balance.
Place almost all of your weight on the seat. Do not stand up on the pedals!
The balls of your foot should be on the pedals, not your toes or heels. When you get on, if your feet are not correct, twist them back and forth until they are correct.
The quickest way to learn is to have two parents, adults or friends help you out. Have a person on each side of you and have them walk around with you while you ride it. At first you can lock arms and eventually go to holding hands. Then once you get comfortable you can let go of one person and practice with one helper. With one person you will want to hold hands until eventually you are only holding fingers and then nothing!
Make sure the seat is the correct height (the top of the saddle should roughly be an inch higher or lower than your naval/belly button ).
Use your hands outstretched for balanced. Yes, it might look like you are swimming at first but with time you’ll get better and look like a professional!
Lean in the direction you want to turn and the wheel will follow.
THE MOST IMPORTANT THING IN LEARNING IS TO DON'T FORGET TO SMILE! Have fun and you will learn in no time.
Please be careful as you are responsible for your own safety! Do not learn around busy streets, parked cars or other things that could be dangerous. Feel free to contact us anytime if you need any help repairing the unicycle or want more tips on learning how to ride.
-
Teaching Space
Finding the ideal teaching space is very hard to do. First it should be a smooth flat surface clear of any obstacles or debris. You should have at least one long clear wall, without any doors or alcoves in it. Ideally the bar should be at chest height.
The ideal space is often not available, in fact I dont think I have only ever seen one. So you are then picking the best space that is available.
Here are some of the things to look out for:
- Doors - I have seen people hit by doors or fall through them when they put weight on them. In the worst case I have seen someone who was using the door itself for support and fell backwards closing the door and then trapped their fingers as they went down.
- Grass - It is not that this is unsafe, just a lot harder to teach on if the wheel is not on a smooth surface.
- Carpet - Unless it is very thin it tends to add drag to the wheel and makes it hard to ride on.
- Astroturf / Composite Rubber - These can be found on tennis courts and track courses, there seams to be no set answer here. Some say they are great places to learn other times they are nightmare with catching the tire and causing drag like carpets.
- Flagstones - Check them for being smooth and without large gaps between them.
- Tarmac - This can be good to ride on but when people fall they will get scrapes on their knees and hands.
- Glass - A lot of modern spaces now have large glass window panels. Avoid!
-
Reducing Risk While Learning
Here is a check list before you actually get to teaching.
Environment Check - Be sure that there are no tripping obstacles on the floor or walls.
Unicycle Check - Are all the unicycles in working order? Quick releases fitted and tightened properly and pointing down, pedals tight and tires pumped up. You then need to be sure that the seatpost is the right hieght to the person correctly. From sitting on the seat the leg should be absolutely straight when the pedal is at the bottom of the stroke.
Safety Talk - I warn people that this is a physical activity and that they should expect fall at some point. They should be aware of riders around them and not ride too close to them. They should listen to advice given as it is often guided towards keeping them safe. I often tailor the talk to warn people of the dangers of the environment they are in like Avoiding doors, pillars, holes etc. I also ask people if they are prone to falling or breaking bones, if they are then I recommend wearing safety equipment. We always recommend this anyways for precaution.
Clothing Check - No baggy pants, no scarves, or loose articles of clothing. I also make everyone tuck shoe laces into their shoes. I always show my shoes, since I always tuck my laces in it is a good example.
Safety Gear - When you are doing basic level teaching of unicycling I feel that most safety gear is welcomed but it is a must to have a helmet and wristguards if you want to totally reduce the risk of injury or are prone to injuries. I will add there that a beginner should be taught to fall properly, without this then yes they do need protective gear. There are exceptions where I would not recommend wearing safety gear, this is where the environment or the person can't for a performance or similar riding.
-
Teaching:
There are 5 key stages to the riding. Different riders will need different amount of time at each stage. There are also different techniques to help at each stage which I hope we will explain.
Getting on the unicycle
1. You need to find a wall next to some flat ground with a rail to grab ideally at chest height.
2. Get the beginner to stand side on to the wall holding the hand rail with one hand and holding the front of the seat with the other.
3. Ascertain which pedal is going to be their leading foot you can normally just ask them or look at which foot they want to put on pedal first.
4. Ask them to then sit on the seat. Then show the beginner the correct position for the lead pedal, it should be in the 4 o'clock position.
5. Get the beginner to then press on the pedal so that the unicycle winds up underneath them. The pedals will then be vertical then ask them to use the other pedal to ride backwards so that the pedals are horizontal.
Finding Balance
You should leave the beginner for about 5 to 10 minutes just sitting on the unicycle. This is time just to allow them to familiarize themselves with the experience of sitting on the saddle and finding their balance.
You need to emphasize:
1. Keep all their weight on the saddle
2. Sit upright
3. Keep the pedals horizontal (although some moving to find balance is good)
4. Keep one hand on the wall while the other is straight out.
5. Look ahead at a fixed object.
Dismounting - You need to show riders how to dismount safely. Get them to step forward off the unicycle letting it fall away to the floor. Do not let them catch the unicycle. Repeat this a few times. It will also help build confidence at getting on the unicycle.
Moving - Get them to move slowly along the handrail at walking pace. Emphasize that they need to rotate the pedals smoothly, put all of their weight on the saddle and look forward. Its ok if you have to remind them to put all their weight on the seat several times. They should have only one hand on the handrail and the other should be held out away for balance. If you have a large group you should set up a one way system along the handrail. This stage varies in time between individuals from 5 minutes to an hour or so.
Letting go - When they have succeeded in moving smoothly along the hand rail you need get them to let go from the handrail. There are 2 basic techniques here, you can get them to veer off from the moving position or launch out at 90 degrees from the handrail. I personally prefer the second as it gets them safely away from the handrail faster. Before you leave your beginner to practice letting go of the handrail you need to get them to practice dismounting. Do this several times and be confident that they are walking off the front of the unicycle upon dismount and not trying to catch the saddle.
At this point I will tell you about my brother. He does not ride a unicycle, but I tried to teach him at one time. He was at the letting go of the handrail stage, he did this and succeeded very well, getting halfway across the hall fist time (I claim it is in the genes although that is probably not true). I then encourage him to go further, thinking he may pedal the full length of the hall second time! Well he did, almost. He panicked and dismounted to the rear a foot or so from the wall, this propelled him backwards across the floor in a heap of pain. After his trip to the hospital he gave up learning to ride.
There are several additional aids and tip to help at each of these stages. I tend to demonstrate all the stages my self pointing out the key things at each stage. This helps the beginner see what they should be doing clearly. The moving stage can be helped by using 2 assistants to hold a broom handle out at the right height in front of the rider for them to hold or try a shopping cart.
For nervous riders it is often useful to give them a hand to steady them. This can be done in several ways, for maximum stability use 2 hands, one to hold the elbow and the other with palm clenched and facing downwards down to allow them to hold your wrist. When they are more confident you can offer them just your hand or forearm. A good technique at this stage is ride next to the learner holding their hand, be sure to have your hand palm outstretched so that they can disconnect at any stage. This offers moral support and a perfectly smooth platform that moves that the same speed as they do. When working with large groups I tend to split the group into pairs. This allows them to help each other, particularly in the moving stage where a steadying hand is helpful.
I think one of the best ways to help people to learn to ride is offer them encouragement. You can also encourage continuation of their learning by finding their local unicycle or juggling club.
Things not to do:
1. Don’t use walking poles, these are dangerous to the rider and other around them, they also encourage slouching.
2. Don’t try and teach too many people at any one time.
3. Don’t support the saddle at any stage except in an emergency to stop a rider from falling off backwards, then go back to teaching the correct dismount.
4. Do not stand in front of someone learning.
Teaching for me is often as rewarding as actually doing a new trick or playing a good game of unicycle hockey. As you will find people learn in different ways and different speeds, its so rewarding to see this.
-
Selecting a unicycle:It is important when that the unicycle you select is the right one for that person. This is often not an easy call and sometimes it takes several tries to get the right unicycle for a person.
This is a quick general guide:
12" unicycle - For children under 6 years old
16" unicycle - As soon as they can fit on them, but generally from 6 to 10 years old children.
20" unicycle - As soon as a person can fit on them and this is normally from 8 years old and upwards.
24" or 26" unicycle - People over 6 foot, road cyclists or mountain bikers
Trials/Muni - These unicycles make great learning machines for bigger/heavier riders. The lower tire pressure helps absorb bumps etc. They also hold up a lot better if your teaching a high volume of people, also work well for teaching outside.
For an exact fit use the guide:
Simply measure your inseam (the distance from the floor to crotch, with shoes on), and use this information for the guide below.
12" unicycle - For inseams 19" 1/2 to 21".
16" unicycle - For inseams 21" to 25".
20" unicycle - For inseams 25" and taller.
24" unicycle - For inseams 28" and taller.
26" unicycle - For inseams 30" and taller. -
Location:
Places to Learn:
- The gym or indoor area with a smooth wooden floor and a handrail about elbow height is ideal.
- A tennis court or outdoor concrete path that is swept free of small stones and has no bumps or cracks. A firm handrail or fence is helpful.
- A narrow hallway allows you to hang on to both walls. Work your way along and back, trying to hold on less and less each time.
- Start between two chairs placed back to back in front of a wide open space. Get your balance then launch into space Get two friends to hold you up, or get between a friend and a wall. The friends should be half a pace in front of you and carry none of your weight. Its cheating if you have your arms around their shoulders!
-
Adjusting:
Few Quick Adjustments:
- The wide part of the saddle goes at the back. Double check the pedal and crank marked “L” should be on your left, “R” on your right.
- When you’re seated on the unicycle, with the heel of one foot on a pedal in its lowest position, your leg should be almost straight. Getting the right height is important. If not your riding posture will make learning much more difficult. If the seat does not go high enough you’ll need a bigger unicycle or a longer seat post.
- A quick rule of thumb is to stick your thumb in your belly button and set the top of the saddle at that hight. This is generally the easiest way to set the hight of the saddle.
- Unicycling is generally not dangerous, but expect to fall every now and again, especially while learning. The vast majority of unicycle falls result in the rider landing standing uninjured on their feet. We recommend wearing a helmet, wrist guards, sneakers and pants or shorts with leg armor.
-
Mounting:
Mounting in Eight Steps:
1.Stand with both feet flat on the ground, legs apart.
2.Put the seat between your legs.
3.Walk forward so that one pedal is in the 4:00 position.
4.Step onto this pedal.
5.This is different from a bicycle. If you stand on the front pedal, the unicycle will roll away as you attempt to get on it. Hold on to the handrail or fence.
6.Step onto the lowest pedal.
7.As you step up the wheel will rotate 1/4-turn backwards. You should now be on the seat with the wheel underneath you. Pedal backwards 1/4 turn to get your feet horizontal.
8.This gets you out of the “dead spot” when your cranks are vertical.
-
Balance:
Getting Your Balance:
Now that you have Mounted, rock there for a moment and feel for balance. You can keep your body still and let the unicycle move under you 1/4 turn each way.
1. Sit up straight
2. Not too stiff with your chest puffed up
3. Not too floppy with your bum stuck out the back: Watch for Elvis Pelvis
4. Straight but relaxed is good
5. Keep your weight on the seat.
6. If you stand up or put too much weight on the pedals the unicycle will wobble as you ride.
-
First Steps:
Taking Your First Steps:
Now you you can Balance you are ready to go forwards, along the rail.
1. Reach forward and grab hold further along the handrail. Lean forward slightly while pedaling slowly.
2. Pause when your feet are horizontal again to check your posture and that you are sitting on the seat and not trying to stand up on the pedals.
3. Take it one “step” at a time from horizontal feet with your left foot forward to horizontal feet with your right foot forward. Its just like learning to walk.
4. Make sure you are sitting up straight.
5. Build up from one step at a time to two steps, then three steps.
6. Try to hold the handrail less and less until it is only needed for occasional balance correction.
-
Launch:
Launching into Space:
Now you have taken your first steps, gradually lean less and less on the support. Try just running your hand along the rail for extra balance.
1. Remember to relax! Keep your weight on the seat.
2. Riding speed is a fast walk, so practice going along the handrail at this speed.
3. To steer, point your knees / swivel your hips the way you want to go.
4. Steer gradually away from the wall for one or two revolutions, then come back to regain balance.
5. Try to let go of support for one or two turns of the wheel.
6. When you reach the end of the handrail, just keep doing the things you have been doing beside the handrail and ride on out as far as you can.
-
How to Idle:Learning to Idle:
Idling or rocking is a useful basic skill. Here are some tips for learning to idle:
1. Saddle at the right height (leg almost straight at the bottom of the stroke)
2. Lots of weight on the bottom pedal, it does most of the work.
3. Remember it is a pendulum action, NOT riding back and forwards. Note the idling in this video.
4. Since your shoulders do not move forwards and backwards, you can use them to give balance guidance while learning.
-
Sponsorship:
Sponsorship General Information:
Thank you for your interest in being apart of Unicycle.com as a Sponsored Rider. Being a sponsored Rider for Unicycle.com is a great honor and responsibility. What this will entail for you if you are interested in being a sponsored rider:
REQUIREMENTS:
- Must be over the age of 12.
- Must be known by and respected by your Unicycle peers.
- Must be active in the unicyclist community.
RULES:
Yearly sponsorship only, All must reapply.
UDC can terminate the contract if the rider misrepresents any information on their application.
UDC can terminate the contract if the rider is not fulfilling requirements.
Rider can terminate the contract if they feel they cannot fulfill the requirements.
Rider must wear company sponsored apparel while competing at major events they are sponsored for i.e. (if trials is their discipline in riding, they should be wearing a UDC or Nimbus brand apparel during the competition) Freestyle is the only exception to this rule, but warm up should be in sponsored apparel. Sponsored Apparel should be worn while accepting awards and photo sessions.
Rider must be active in 2 of these: making videos, Facebook, Unicyclist forum, and Twitter.
- 1. Videos should have the rider wearing sponsored apparel, riding on Nimbus or UDC branded unicycle, wearing safety gear as well to show new riders that safety is important.
- 2. Facebook posts should support the Nimbus and UDC brands as well whenever possible.
- 3. Posting to the Unicyclist forum should show the rider supporting the components of the Nimbus and UDC brands.
- 4. Riders are expected to participate at Nationals in the discipline they are sponsored for in the country or close to the country they live in.
APPLICATION:
We here at UDC like creativity so we will leave this up to the rider on what that should look like.
Generally what is included in the submission is:
1. Unicycle events attended and any placements that were won.
2. Short bio of the riders unicycle life, when they started riding, why.
3. Bio of rider, school, age, ambitions.
4. what the rider will do to promote the UDC, Nimbus brands.
5. how active are they on FB, Twitter, Instagram, etc.
6. video of riding abilities in the discipline they are submitting for.
BENEFITS TO RIDER:
UDC or Nimbus apparel
One free unicycle will be awarded per year for the discipline of riding the rider is being sponsored for of UDC or Nimbus branding. There also may be possibility's to receive prototypes to test for us as well.
Special pricing on unicycles and parts - Warning: Special pricing will NOT be disclosed or shared with others or contract will be terminated!
-
Why Sponsorship?
The Why, How, and What’s Next Guide to Athletic Sponsorship:
Athletic Sponsorship.
These words mark your acceptance in an elite group and are like gold to some athletes. After all, who doesn’t want free stuff, or a team’s endorsement that your riding is among the best? In my experience, it’s not that simple. Sponsorship is a job, and it takes good planning to pull it off so you stay motivated and having fun and keep your sponsor happy.
I’d like to share some tips based on my own sponsorship experiences that I hope will help riders looking for support. So far there are very few sponsored unicyclists, but as our sport continues to grow so will the opportunities for professional riding. If you want to be sponsored as a unicyclist, there are several important questions to ask. Why do you want sponsorship? Why would a company benefit from sponsoring you? How do you get started? And once you’re sponsored, how will you keep both yourself and your sponsor happy?
Question No. 1: Why?
The first question, why do you want sponsorship, is the most important. Is it for public recognition? Free stuff? For others to tell you that your riding is good? Do you dislike commercialization in sport but still want the freebies? Or do you love riding for its own sake but have personal goals that a sponsor could help you achieve? Do you want to just cover some of your costs, or make a living from riding? Asking these questions will help you decide whether the effort needed to obtain sponsors is worth it, and whether sponsorship is really what you are looking for. When asking yourself why you want sponsorship, it’s also important to be honest about your personal goals. If your favorite activity is solo distance touring and you hate telling anyone about it, you likely won’t find many sponsorship takers. If you feel that your values are compromised by letting a company have any say in how you act or what you do, you probably shouldn’t seek sponsors either. In addition, don’t assume that because you are a great rideryou “deserve” sponsorship. There are lots of great riders out there, and there is usually someone better. Being a top rider will open the door for you, but that’s about it. The skills you have at public relations are more than 50% of the sponsorship equation.
Question No. 2: How?
To figure out how a company can benefit from you, you need to know what they want. Companies sponsor athletes because they have goals that an athlete can help them accomplish. Those goals include growing a brand image, increasing their market share, and supporting a cause that the company cares about. Getting sponsored means showing your sponsor you add value. Here are a few tips: Find ways to build your riding career before you look for sponsors. Build a trials demo setup and do shows. Build a website and video page. Make sure you’re known to the worldwide online community. Go to major unicycling meets. Learn to film and edit videos or find friends who can film you. Communicating about your riding is your most important asset, and online videos are your #1 tool to getting your name out there. Also, build a collection of high quality still photos. Great stills are much harder to find than videos. Treat applying for sponsorship like a job application. Make a professional, up-to-date resume and cover letter. Spelling and grammar do count – this is your face to the potential sponsor. Seek sponsors that share your values. If you want a drink company to sponsor you but you actually think the stuff tastes like cough syrup, you will have a hard time believing in what you do. Seek mainstream clients willing to pay for demos or performances irrespective of sponsorship. Growing a trials or street demo business is a great way to get paid to have fun and learn to run your own business. Get a talent agent if you also like to act. Commercials and films are hard to land but are potentially very lucrative. Some agents specialize in adventure sport athletes. Be realistic with your expectations if you pursue sponsors within the cycling industry. Remember the unicycle industry is still very small and only a handful of the very top riders get any support at all. Look for local support first, perhaps at your local bike shop. Outside the cycling industry, don’t be afraid to think big. Dan Heaton is a major part of Columbia Clothing’s Fall 2008 ad campaign, and there’s no reason that the right rider can’t become a household name as the face of a large, global company. Be persistent with your prospective sponsor, but don’t take it too far. Many cycling industry sponsors review applications in September-November and may not consider proposals at any other time. If they’re not interested, don’t take it personally. You may simply not be a good fit with their program. For example, some cycling companies focus their sponsorship program on events, not individual athletes, and that has nothing to do with your skills. The best part about sponsored riding is not the freebies. It’s that it can open doors to meet people and have riding and travel opportunities, and that it puts you in a position where people listen when you speak about things you care about. If your primary interest is discounts on gear, it is much more efficient to get a part time job. Take time to improve your public speaking and writing skills. Your ability to interact with the public and with the media are just as important as your ability to ride. These skills will build your confidence and help you to ‘sell’ yourself. Landing a sponsorship is really similar to landing any other job. If your technical skills are not world class, you can often make up for it with great people skills.
Question No. 3: What’s next?
In other words, once you’re sponsored, what do you do to keep both yourself and your sponsor happy? This involves making sure that you both understand each other’s expectations. Here are a few tips: Communicate regularly with your sponsor. Let them know what you are up to, especially if you get media exposure or do well at competitions. Send them all your photos and videos. Don’t ever let pro riding (or returning to recreational riding) affect your feeling of self-worth. Sponsorship is a tool to help achieve goals, not an end-purpose. Realize that different sponsors appreciate different skills. Mainstream sponsors are not usually impressed by technically difficult tricks if they don’t understand why it’s hard. Don’t slag other companies or products. Giving honest feedback is one thing (and companies often want that) but negative comments can really come back to haunt you. Realize that sponsors love it if you do well in school or have a cool day job. Don’t forget that other riders, especially kids, watch you and look up to you when you are talented. Whether you are sponsored or not, other riders WILL notice how you treat your riding environment, how you dress, and most of all, how you treat other people. Wear a helmet and safety gear! Companies often require helmets as a condition for promoting your photos and videos. Few things are more frustrating than great photos or video worth nothing or worse to a sponsor because the rider is not wearing a helmet. If you get hurt, that might be the end of your sponsorship. Remember that media photos and video are forever, and that they are always out of context. That video of you damaging public property might have been funny at the time, but consider how it looks to strangers online. Thank your sponsor with a formal letter at the end of each season. Provide a summary of everything you did over the year and a proposal for next year if you want to continue. Be as specific as you can. Over the season, keep a written record so you don’t forget what you did.
I hope these tips are useful to figure out whether sponsorship is for you. Try not to take it too seriously. No matter how much you love it, it’s really just a fun game. In the end, the only thing that truly matters is how feel when you ride. Kris Holm. Kris was the world’s first sponsored mountain unicyclist. He has been sponsored by Norco, Roach, Arc’teryx, and Rider’s Eyewear. Kris is currently riding for Horny Toad Activewear.
-
Unicycle.com on CBS News?
It's true! We were on the CBS Evening News with Katie Couric on Friday, February 23, 2007. Steve Hartman produced a segment for the Assignment America series that featured unicycling. Here's a link to the story on the CBS News Web site:
CBS Evening News story on unicycling!
What safety gear do you recommend for a new unicyclist?
We recommend a helmet and wrist guards for all unicyclists, no matter the age or experience. Wrist guards will reduce the chance of wrist breakage and the plastic splints will save the skin on your palms if you land with any speed.
-
What safety gear do you recommend for a new unicyclist?
We recommend a helmet and wrist guards for all unicyclists, no matter the age or experience. Wrist guards will reduce the chance of wrist breakage and the plastic splints will save the skin on your palms if you land with any speed.
-
The History of Mountain Unicycling?
Early in 1999, when first we heard about mountain unicycling (MUni), we thought there were some nuts out there. But after taking a ski lift to the top of a mountain at Snoqualmie Pass, Washington, and riding down the bike trails, we were hooked. If one could combine the sports of snow skiing and mountain biking, it would be MUni.
The word MUni was coined in the UK by Duncan Castling. It's now a registered trademark of the Pashley Cycle Company in England.

George Peck, a soft-spoken magistrate living in Seward, Alaska, is credited with giving birth to the sport of MUni.
George created a videotape entitled "Rough Terrain Unicycling", giving tips and techniques that he'd learned on his own. It was sold by the Unicycling Society of America, and interest in the sport grew quickly.
In the UK, Roger Davies began off road unicycling around 1987. He was pictured in MB (Mountain Bike) UK magazine on his Pashley Muni 26" (a converted 24"). Visiting friends in California, he was riding down Mammouth Mountain in California, a 4 mile course.
At that point, Roger had never met any other unicyclist, MUni or otherwise!

Kris Holm, a geologist living in Vancouver, B.C. is considered the premiere MUni rider today. Kris is the only unicyclist on the Norco Factory Trials Team, and he holds the world record in the unicycle high jump at 62cm (over two feet).

John Foss, a three time world unicycle champion, began hosting the California MUni Weekends in the Fall of 1996. He said the idea came to him while riding the trails, just after he'd moved to California. "I just gotta share this!" he said to two bicyclists friends nearby.
Promoting the event on the Internet and word of mouth, John soon discovered the lure of off road unicycling. The first California MUni weekend was attended by 35 riders. By the 1999 event, the number of riders grew to 55.
What is MUni?
There are three types categories of trails that MUni riders enjoy:
Rough terrain: This is generally a trail that has some combination of rocks large and small, fallen trees, stumps, undergrowth and mud.
Uphill: This is the toughest of MUni trails. It requires an extraordinary amount of leg strength and endurance. Mountain unicyclist Ted Howe rides uphill trails for fitness.
Downhill: These trails are the most fun. The best way to begin your downhill trail ride is on a ski lift. Seriously! Take a lift to the top of a mountain and ride down the bike trails. It's an absolute blast.
What kind of equipment do I need for MUni?
MUni pioneers like George Peck and Kris Holm built their own off road unicycles, in some cases spending thousands of dollars. Riders like Bruce Bundy and Geoffrey Faraghan applied mountain bike technology to theirs.
Unicycle: The best off road uni's to date are built with some combination of these components, at minimum:
- Hardened, splined axle
- 170mm (6.5") or longer crank arms
- 36 spoke wide rim
- 24" or 26 x 3.0", knobby tire
- Pedals with pins or mild teeth
Safety: We recommend wearing all of these items when you MUni:
- Helmet
- Wrist guards
- Elbow/forearm pads
- Knee/shin pads
- Ankle Guards
-
Why buy from Unicycle.com?
Here at Unicycle.com we are all unicyclists and have many years experience in unicycling. We know what is good and bad in a unicycle! We are a specialized unicycle store with hundreds of unicycles and unicycle accessories. Whereas your local bike shop may have a unicycle or two in stock, if you are lucky! Is it going to be the right one for you? We have a wide range so can supply the unicycle to suit your needs, whether you just want a basic unicycle to learn on, a unicycle to perform on or a specialized off-road or trials unicycle. We sell a complete range of parts for unicycles for upgrading or just maintenance and only sell parts that are appropriate for unicycles. From pedals, tires, tools and Safety equipment we have used our years of experience to find the most suitable products at the best prices delivered to your door.
-
How to make snow chains:
How to Make Unicycle Snow Chains:
Surprisingly It is pretty easy to ride under the right snow conditions and at least ridable in almost anything. If you too want to give it a try, here's all you need to do:
First, learn to ride a unicycle. (If it's not completely obvious, it's hard to learn in the snow.)
Next, go to the hardware store and pick up some raw materials.
You will need a surprising amount of chain (I used .77"/link chain). You will also need two clips to join the chain to the wheel.
Fortunately it's all pretty cheap stuff. Take your wheel diameter (likely 20" or 24") and call that D. If you use the same chain size as I did, you'll need (d - 6") pi x 4.25 inches of chain. (That's 15.58' for a 20" wheel or 20.1' for a 24" wheel.) The chain will form a d - 6" diameter circle on each side of the wheel with a 9 link cross chain every 4 links. (I originally made it with a cross chain every 9 links but found I didn't have the traction I wanted.)
Here's how to assemble it:
- The tools I used were a pair of regular pliers and a pair of needle nosed pliers.
- There are two loops of chain, one on each side of the wheel, attached by cross members.
- Here's what I found worked best:
opening the chain: Laid flat the chains will form a ladder shape. (You want to make sure that the side chains are lying flat so that you don't have kinks once you finish.) break apart the chain so that you have two lengths that are just over (D - 6") pi long each (that's inches). Lay the two chains next to each other and make sure they are free of kinks. Take the remaining chain and break it into 9 link lengths. Now attach those 9 link sections to each side of the two long chains. Here's the effect you should get:
laid flat: Be sure that there are no kinks and that every cross member attaches at exactly the same spacing. It's not crucial to the chain's performance but the chains will look much better and fit more snugly to the wheel that way. Once you have put on all of the "rungs" of the ladder shape, you need to attach The clips. (You may be able to get away with not using clips and just leaving a link open at the end to act as a hook but I have't tried.) Now you can get the chains on the wheel. This might be easier with two people but it's not that hard. This is the point where you'll see if you made the chains long enough. (If they aren't, just add more chain an no one will know the difference.) At first the chains will be very tight but after a few minutes of lining things up you should be able to tighten things up by a link or two.
Done!
Finally, the fun part. Can you ride it? I've found the chains work fine on pavement and cement as well as industrial indoor carpet. Watch out for things like marble flooring. Although the chains grip well in ice, on hard, smooth surfaces you are riding on just chain and have almost no grip. Ideal surfaces are packed snow and fresh snow on cement and asphalt (like a sidewalk or parking lot).
Obviously riding in the snow is dangerous. The chains do help but still use caution as all forms of unicycling is inherently dangerous.
-
Brief Unicycle History:
Let's look into a bit of the history of the unicycle... Once seen strictly as a conveyance only used by performers and acrobats, in recent years the unicycle is fast becoming a popular way of getting around by a growing number of enthusiasts. Although historians can't exactly agree on the exact origin of the unicycle, one much favored theory of the origins of the unicycle is due to the general popularity of the old fashioned big wheeled penny-farthing (also called the "Ordinary") ridden in the late 1800s century. In this old incarnation with the tall front wheel and tiny back wheel, the pedals were connected directly into the front axle, and the rear wheel would lift off the ground allowing the rider to move slightly forward to ride. Over time, there were many penny-farthing owners who found they could get rid of the frame and just ride on the front wheel and handlebars. There is ample evidence to support this theory of development in the form of pictures dating from the late 1800s which show unicycles with the same kind of large wheels as the penny-farthing. Throughout the history of the unicycle, the basic form remained more or less unchanged in form up until the late 1980s. At this point, they were used mainly by performers and acrobats, rather than by the average enthusiast. Throughout the 20th century, the growing number of unicycle enthusiasts has proven to be an inspiration to the various manufacturers to come up with new designs. Today we have the seatless (also called the "ultimate wheel") and the tall (or "giraffe") unicycle which is chain driven to account for the greater height. Also included in the list of different models are the freestyle unicycle that is generally used to highlight skills and routines. The trials unicycle which are stronger than a standard unicycle and have a oversized tire for hopping on to and over obstacles (a session style sport). The offroad unicycle ("MUni" or "muni" short for mountain unicycling) has a number of the same kinds features as the trials unicycle, but they have a few critical differences in diameters of the tires (24" to 36"). Mountain unicycles allow the rider to roll over obstacles such as roots and rocks more easily. Brakes sometimes are installed to maintain control steep descents. The touring unicycle (29" to 36") is designed especially to cover long distances. The wheel diameter is larger so the rider can cover more distance with less pedal rotation.
Another version...
The most accepted theory for the appearance of unicycling is that it was found "by accident" while riding a "penny farthing". This kind of bike had a disadvantage: when you applied the brakes it was very easy to be thrown over the front of your bike. Get rid of the useless parts and you're left with a much safer vehicle. And so, unicycling was discovered... There is also the theory that they were brought by the pixies.
-
Where's the other wheel?
A: Real men (Women) don't need two wheels.
A: I'm paying for it in installments.
A: You're kidding, it was there last time I looked (and promptly fall off).
A: I got the bike on sale, half off...I didn't realize they meant the bike.
A: This is the recession model.
A: Two wheels? That's twice as hard!
A: My other wheel? Why, I don't need a training wheel anymore! (my favourite, to bike riders)
A: It was stolen!?!
-
Unicycle Benefits:
Recent scientific research demonstrated that unicyclists improve their concentration ability, balance and motor coordination. This activity plays an important role on the physical and mental development.
After this research, the Japanese Educational Department officially recognized this discipline: they integrate it in their school program. Today, there is over a milion unicyclists in Japan.
Also, an International Unicycling Federation was founded in Japan, June 1st 1982 and further to the elaboration of a structure and a regulation for this sport, the Federation sanctioned the first World Unicycling Championship which took place in Syracuse, New York, in 1984.
-
Safety Gear:
We recommend wearing all of these items when you are learning, trying new stuff and pushing the limits of unicycling regardless if its on the street or in the woods. Remember that safety gear is cheaper than stitches.
- Helmet
- Wrist guards
- Leg armour
- Elbow (optional)
-
Can I order through an authorized Unicycle.com dealer?
Yes!
Our dealer network is made up of independent business people who love the sport of cycling. We support them, and we encourage you to support them, too. If your favorite local dealer has not yet joined our Unicycle.com dealer network, we hope you'll encourage them to do so. Select the Unicycle.com product you want, call your local dealer and ask them to place an order with us. We appreciate it!
-
Can I buy your unicycles from my local bike shop?
Yes, We do have a few Bike shops that sell some of our unicycles. We gladly invite all bike shops to carry unicycles from us. We will and do work with the staff in these shops for their unicycle knowledge so they can support the products correctly. If your local bike shop would like to carry unicycles for you have them contact us to become a dealer, we would love for them to be part of the family. No bike shop can possibly sell the full range of our unicycles… they just can not stock over 140 models of unicycle as we do.


